#12 in the Effective Mind Maps blog post series
Many mind mapping software programs enable you to convert topics into tasks and manage simple projects with ease. Here’s how:
1. Get started: Create a topic in the center of the map that describes your project in 1-3 words.
2. Do a brain dump: Create sub-topics for each of the major areas or sections of your project plan. Don’t mentally edit yourself at this time – this is just a “brain dump” of anything you can think of related to your needs for this project. Include such things as information needed, budgetary issues, timetable, people, resources required, implementation steps and the like. As you add these first-level topics to your map, additional ideas may pop into your head. Record them, without any regard for their organization.
3. Organize what you’ve brainstormed: Now look over the content that you’ve added to your map and begin rationalizing it, by grouping related topics together. Mind maps give you much more freedom to “refactor” your information than other types of software, which is one of its most powerful but little understood advantages. Refactoring is the process of moving topics from one part of your map to another and, in so doing, re-evaluating and reconsidering the relationship between that parent topic and its new sibling. Think of it as a visual “what if” process.
4. Review for completeness: Review each major topic and its “child” sub-topics in turn. Ask yourself questions such as “Is this section of my map complete? Are there any other details I should add?” If anything pops into your head, record it in your map.
5. Create a place for uncategorized items: As you consider and tweak the content of your map, you may find that some topics and sub-topics don’t fit neatly with the rest. You may want to create an “uncategorized” or “to be categorized” topic where you can drag and drop these items for later consideration. Don’t be afraid to walk away from your map for a few hours or even a few days – when you return to it, your mind will be in totally different place, and that will suggest additional edits, additions and deletions to further refine your map.
6. Add links to supporting information: Once you’re satisfied with the structure of your mind map, it’s time to add supporting information – links to files, web pages, e-mail messages and other resources that are related to your map’s content. This step transforms your visual project plan into a “visual database” that encompasses everything related to your project.
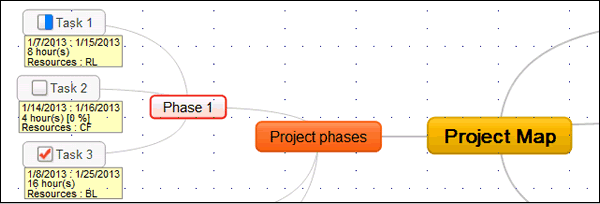
7. Add project tasks and assignments to your map: If your map contains “to-do” items, you can utilize your mind mapping program’s task management tools to assign people to tasks, indicate their priority, and assign start and end dates to them. If your mapping program includes an integrated Gantt chart view (OpenMind 2, MindManager with the IntelliGANTT add-in and iMindMap 3 offer this functionality), then you can visualize all of your tasks and their timetable in one concise, tabular view.
8. Add group key milestones and deadlines into a timeline: If you format your map with all branches facing to the right or left, it’s easy to arrrange tasks in time sequence, from top to bottom. This enables you to create an easily understandable visual timeline.
9. Group tasks and information visually: Don’t forget that you can visually “group” items utilizing your mapping program’s symbols or icons. For example, you can use an image of a phone to designate calls that you need to make. This isn’t just adding pictures to your map for the sake of adding visual interest – it actually makes it possible to filter your map’s content to show only the phone calls you must make, or only the tasks that are assigned to one of your team members.
10. Manage the progress of your project: Remember that your mind map is not just a “front end” tool for setting up the structure of your project. It can also be a management tool during project implementation, enabling you to track your progress, tasks to be performed and milestone dates to be reached. At the close of a project, you can use it to capture lessons learned, so your team members won’t make the same mistakes and missteps next time. In short, a mind map can be a “birth to death” project management tool.
How do you manage projects using your mind mapping software? If you have some specific techniques that you utilize that aren’t covered here, please share them in the comments below. Thanks!
(originally published December 17, 2009. Updated to be included in the Effective Blog Posts series Jan. 15, 2013)


Leave a Reply