MeisterTask is a new web-based, collaborative task management tool that integrates seamlessly with the popular MindMeister mind mapping application to enable you to turn your ideas into action. This colorful, lightweight tool is perfect for small teams to streamline their project communication and get projects done faster.
In this product review, we’ll take a closer look at how MeisterTask works, and how it can be useful for small project teams.
Managing tasks starts in MindMeister
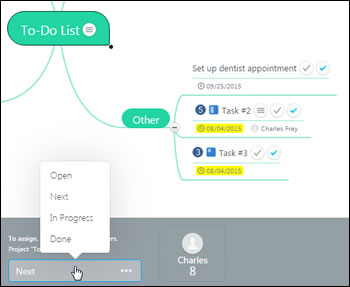 MindMeister, the popular web-based mind mapping software application, enables you to add task information to any topic, including start and end dates, percentage complete, priority and the person on your team to whom the task is assigned.
To move these tasks to MeisterTask, you simple click on a checkmark icon in the footer of the workspace. A window slides into view and asks you if you want to assign the tasks to an existing project or a new one, and displays icons for the collaborators working with you on that board. A pop-up enables you to select the category to which you want to assign each task. If you select new project, MindMeister displays three options: Open, Next and In Progress. If you connect to an existing task board, it will display all of the columns that board contains.
MindMeister automatically creates icons for you and each of your team members within this gray bar, showing the number of tasks assigned to each person. As you create new tasks in MindMeister (or if you have some that you haven’t assigned to anyone yet), you can simply drag and drop them to the appropriate person’s icon.
Currently, you must manually switch between browser tabs containing MindMeister and MeisterTask. But the developer promises a future update will enable you to switch more quickly between the two applications.
Exploring the main screen of MeisterTask
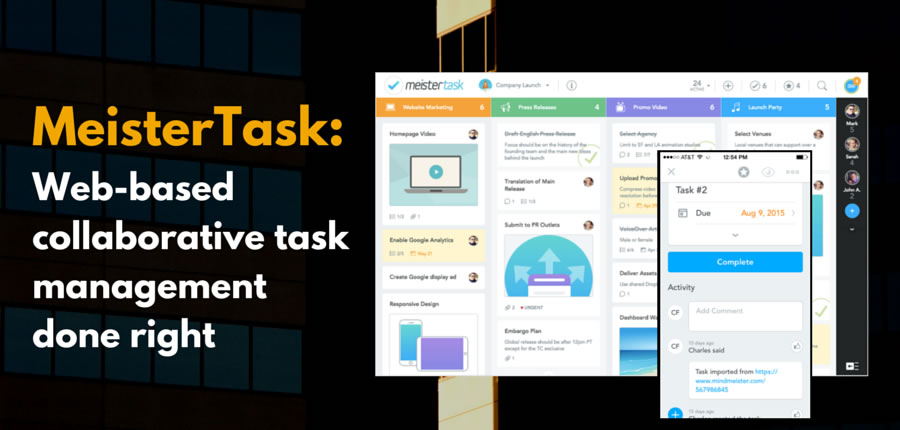
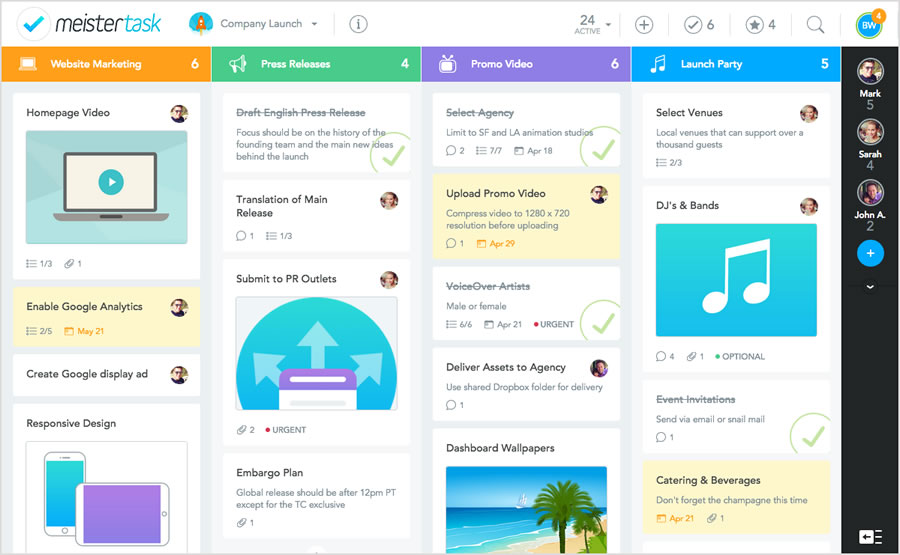 When you open MeisterTask, you’re greeted with a clean, columnar layout. The tasks I created in MindMeister are arranged in a list in the left column, entitled “open.” All of the notes, attachments and task information I have added to my mind map topics are here, contained within each task. Other columns are marked “next” and “in progress,” and there is room for me to add own columns to customize MeisterTask to my workflow. For now, I’m just going to create a new column called “done,” so I can see what’s been completed.
Each task is displayed as a small, horizontal card. To the right of the task name, the person to whom the task is assigned is displayed in a round circle. This makes it easy to visually skim your task dashboard to see who “owns” which task. In the lower left corner of each card, a conversation balloon with a number next to it tells you how many comments a task has received. On the date that a task is due, the card for it changes from a white background to a pale orange, which does a good job of drawing attention to it.
Across the top of the workspace are a handful of buttons and tools that control global functions within MeisterTask. For example, a drop-down list lets you easily switch between task boards. This is great thinking on the part of the developer; many users will want to maintain several task lists to help them manage their different life roles; this tool makes it easy to quickly switch between them.
An information button (a small i inside of a circle) gives you access to a tabbed dialog box where you can adjust your task board’s global settings, including:
- Overview, which lets you change its name, add a description and an image to it and share its link with others.
- Features, which lets you turn on and off time tracking and task relationships, plus integrates this project board with ZenDesk, GitHub and Slack (other project- and task-management tools)
- Members, which lets you manage who is collaborating with you on your active board
- Checklists, which lets you create pre-defined checklists that you can use with tasks in this board – ideal if you have a simple procedure for certain types of tasks that you want to follow the same way every time.
- Time tracking, which enables you to maintain and edit timesheets for each member to track their time spent on tasks in this project board
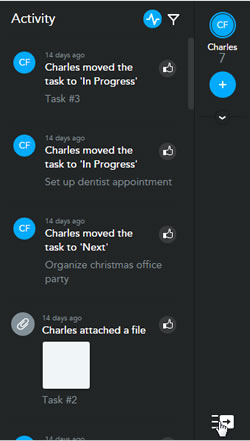 Buttons in the upper right corner of the workspace give me access to several valuable filtered views of my project:
- My tasks (by default, MeisterTask displays all of your team’s tasks)
- Those which you have designated as my “focus” tasks. This looks like the functional equivalent of “A-level” tasks – the most important ones to which you must pay attention.
A sliding vertical panel on the right side of the workspace enables you to manage who is collaborating in this workspace and to invite others (via e-mail) to join the board. Toggling this panel open displays a chronological “activity list,” which gives you a detailed view of who did what to which tasks, when. This list is searchable, so you can zero in on specific events in the project’s history – nice!
This detailed description of MeisterTask’s interface may give you the impression it’s busy and confusing, because it does so much. But it’s not. The layout of this main screen is clean and uncluttered, unlike some collaborative task management applications I’ve seen. It’s a masterpiece of efficiency.
An intuitive way to organize tasks
Assigning tasks to each column is a simple matter of dragging and dropping them to the appropriate column. Tasks can be reordered by dragging and dropping them within a column, too. Arranging tasks in this way feels very simple and intuitive, and provides a useful context for each of your tasks. You can group them by priority or create columns for specific locations or regarding specific people.
So, for example, you can create a column entitled “home” to store your reminders of errands and tasks that involve your family, or another column with your boss’ name, to help you gather a list of issues and follow-ups you must discuss with him or her. I love the flexibility of MeisterTask’s interface, because I can configure it to match the way I work.
Adding tasks and details to them
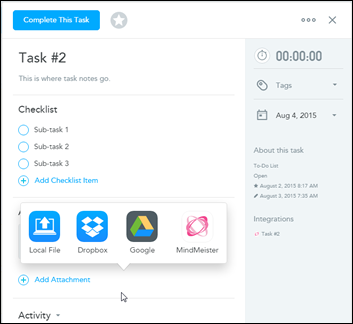 You can easily add a task to any column by clicking on the plus sign at the bottom of it. Clicking on a task within MeisterTask opens a dialog box that gives you more options for adding details to it. You can:
- Create a checklist
- Add an attachment
- Add a comment
- Read the string of comments related to that task
- Complete the task
I particularly like the checklist, which essentially lets you create sub-tasks within the larger task. What’s also cool is when you click on attachments, a small window pops up that lets you attach files not only from your local computer, but also Dropbox, Google Drive and MindMeister. Clearly, the developer is making the most of the fact that MindMeister is a web-based application by enabling it to connect with other popular online file repositories!
You can also view the history of the task – where it started life and how it has been modified during its “lifetime” and by whom. This could be quite useful to better understand how a task got to where it’s at today.
Tags make it possible to group and filter tasks in MeisterTask in meaningful ways. MeisterTask enables you to create as many tags as you need, assign colors to them (which appear as a small, colored dot) and re-use them throughout your task board. A star icon enables you to add a task to a short list of “focus tasks.”
Finally, a large, prominently-placed “complete this task” button at the top of the dialog box encourages you to get things done. When you complete a task, it gets a large, satisfying checkmark next to it in the columnar task view, and the text of the task has a line through it – both are comfortable analogues for the ways in which we designate tasks as completed on hand-written to-do lists.
All of this detailed task data is presented in a clear, well-designed format that is easy to follow and doesn’t overwhelm.
Enabling social task management
No man is an island. Neither is a knowledge worker today. We must all get things done for or with others. MeisterTask makes it easy to assign tasks to others on your team and to hold real-time discussions with them. A button playfully entitled “say it” encourages interaction and keeps the experience of working with MeisterTask fun. This chat icon changes color when new messages have been added, giving me an immediate visual clue that there is something to which you need to pay attention.
Mobile integration
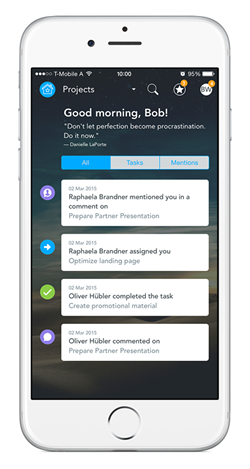 Meister Labs has launched mobile versions of MeisterTask for Apple iOS (iPhone and iPad) as well as the Android mobile operating system. I downloaded MeisterTask to my iPhone and was pleased to see how well MeisterTask’s list-based content translates to the small screen. Like its big brother, this app displays tasks as cards on screen; swiping right and left enables me to move between me open, next, in progress and other columns of tasks.
You can also view a list of activities, invite and manage users and edit the global properties of your projects. A prominent blue button at the bottom of the screen makes it easy to add tasks. Like the browser version of MeisterTask, the mobile version is efficient and well-designed. Clearly, Meister Labs has one or more very talented user interface designers on its staff, because it shows in the intuitive layout and functionality of both the mobile and browser-based versions of MeisterTask.
How can you get MeisterTask?
MeisterTask is a free service for anyone with an existing MindMeister account. If you don’t have one, you can get a personal account for only US$5 per month; Pro and Business levels are also available, which add more functionality to MindMeister and enable team collaboration features. But MeisterTask works perfectly well with a personal account.
Conclusion
When it comes to task management applications, I’m notoriously picky. I’ve always had a hard time finding one that can adapt to my workflow. Based on the time I’ve spent learning how to use MeisterTask, I’m very pleased with what I’ve seen so far. I especially like the browser/mobile app integration, which makes it easy for me to add tasks when I’m on the run, but still access a full list of my to-dos when I’m back in front of my laptop.
For avid users of MindMeister, MeisterTask fills an important need. If you have developed a detailed plan for a project in MindMeister, what’s the next step? How do you implement your idead? MeisterTask is the answer.
As far as I’m concerned, MeisterTask is a winner!

Leave a Reply