Meister Labs recently launched a new version of its beloved MindMeister mind mapping tool that still gives you access to all of the map creation and editing tools you love (plus some new ones) but wraps them in a minimalist workspace that gives you more room to explore your ideas.
The first thing you notice when you login to the new MindMeister is the expansive workspace. There are no big toolbars stealing screen real estate – just a few small ones placed around the perimeter of the workspace to help you accomplish essential tasks when creating your mind maps.
The vertical styling toolbar
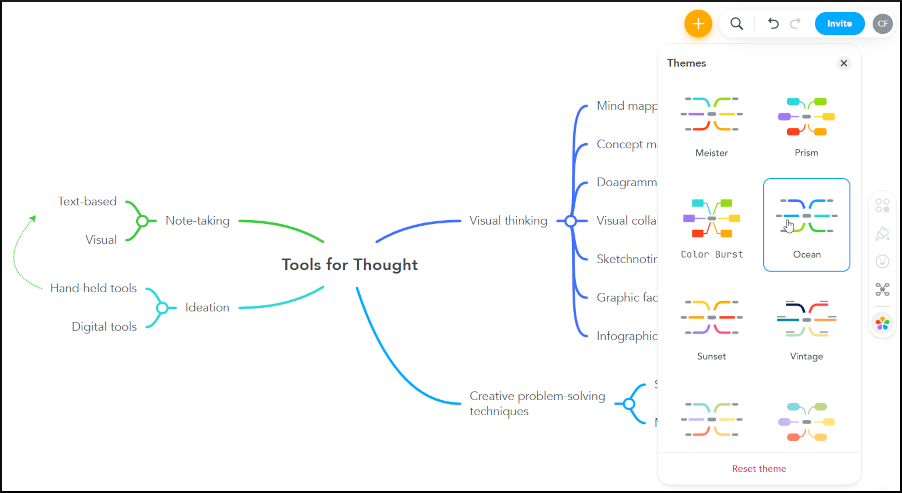
The one you’ll undoubtedly use most often is the new vertical styling toolbar, which contains only five icons. With one exception, they’re gray in color – so they don’t distract you from your work, but stand ready to help you embellish your mind map when you’re ready to use them.
The map styling toolbar contains these tools:
Themes: Select a pre-designed color and font scheme for your mind map – a big time-saver compared to manually formatting all of your map’s elements. These map themes are colorful and well-designed.
Some mind mapping software offers some truly ugly map themes that I couldn’t imagine using in a million years. There’s none of that here – just a nice selection of attractive looks that you can instantly apply to your mind maps.

Layout: Choose from radial (topics arrayed in all directions), org chart (downward pointing) and list (right-facing). These can be applied to individual topics and their children. So, for example, you could have a radial mind map with a first-level topic that has children arranged as a list. Nice!
The new MindMeister editor’s layout menu also contains a toggle button called “auto-align.” When it’s turned on, the application positions your map topics based on the map style you’ve chosen.
If you turn it off, however, you can freely position topics anywhere you want in the workspace. That’s ideal for those times when you want to create something unique – and don’t want to be hamstrung by restrictive topic layout options (one of my pet peeves).
If you don’t like your freely-positioned topic layout, simply turn “auto-align” back on. Your freely-positioned topics will move back to their previous positions.
Icons and emojis: The new MindMeister editor contains a wide variety of icons, arranged into 10 collections that you can access via tabs at the bottom of the flyout menu. You can also do keyword searches for icons and attach them to your map topics.
MindMeister icons are “tintable” – by default, they assume a color from the map theme you selected. But you can override it to add your own custom color. You can also adjust the position of the icon on the topic (left/right/above/below).
You can also easily switch to an emoji library. As you may expect, they’re not tintable.
Style: This menu gives you access to topic design options, including fonts, font style and color, topic shape, color, border colors and more.
Action items: This menu enables you to add tasks, attachments, media (images and video), notes, comments and topic connector lines. You can also assign tasks to your team members in MeisterTask.
Topic notes now support markdown formatting – nice! This is quickly becoming a de facto format for sharing text between applications, especially note-taking and blogging tools. For those of you who are ew to markdown, MindMeister conveniently includes a link to a formatting guide at the bottom of each note.
I’m one of those people who use markdown occasionally, but not often enough to have memorized the most common codes. So I appreciate this helpful touch!
Overall impression: very intuitive
Everything behaves simply and intuitively, making it ideal for first-time users. For example, if I select a topic and then choose the connection command, four plus signs appear around the perimeter of the topic, indicating that the “launch” point for my connector line can be above, below or to either side of the topic.
Dragging a plus sign to another topic causes connection points to appear around the perimeter of the destination topic. Once you’ve dropped the line, you can easily use a point in the middle of it to reshape it the way you want.
Selecting the line also invokes a pop-up menu that gives you options to edit the line color, start and endpoint styles (arrow head or plain) and add a label to the line.
In addition to using the vertical styling bar to edit map topics, you can also right-click on one or click on an ellipsis (3-dots) that appears in the upper right corner of a map topic when it’s selected to access a pop-over styling menu. This enables you to quickly customize the look of your mind map without needing to constantly mouse back over to the toolbar on the right side of the workspace.
New: outline view
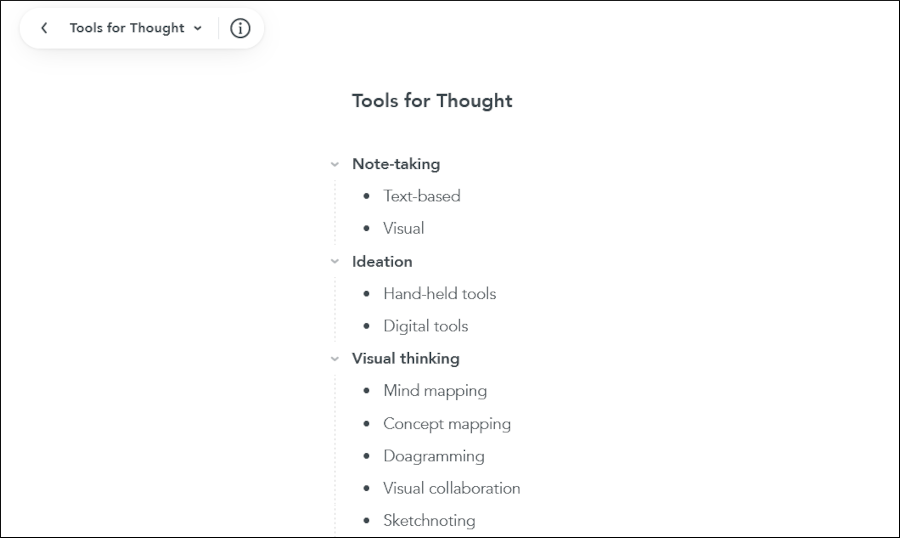
The new MindMeister editor adds an outline view. While this has been a common feature on desktop-based mind mapping software for years, it’s one of the first times I’ve seen it in a web-based mind mapping app. It gives you another way to look at your map content in more of a traditional, hierarchical view.
Roll back your map content with “versions”
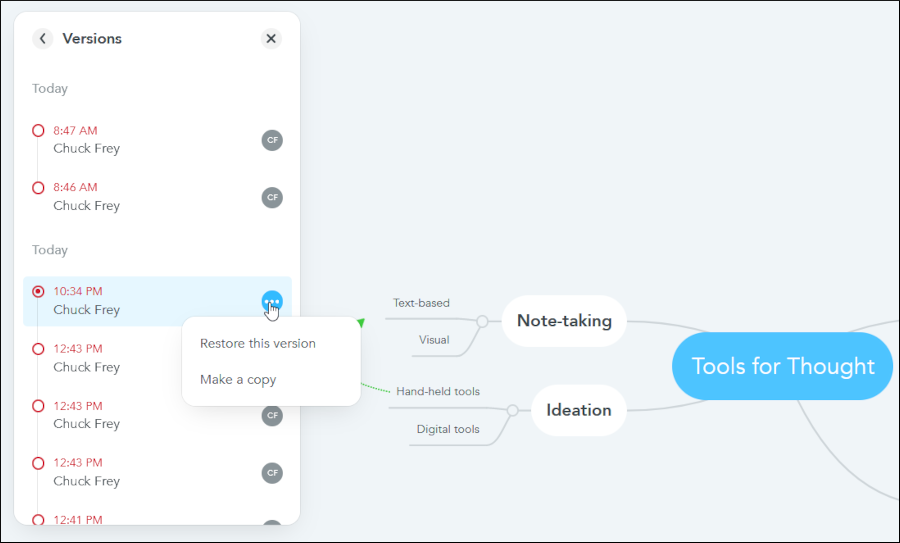
As part of the collaboration toolbar in the upper left corner of the MindMeister workspace, you can now access a new “versions” tool that enables you to view a chronological list of the edits you and others have made to your mind map. They’re simply listed by the contributor’s name and time/date. Clicking on one of them changes your map to that iteration, at least temporarily. Think of it as viewing a snapshot of your map from 5 minutes or 5 days ago.
If you want to revert to that version of your mind map, simply click on the ellipsis button and MindMeister will give you two options: “restore this version” or “make a copy.” Both can be very useful, especially when collaboratively building a map with others.
The first lets you undo changes others may have inadvertently made, such as accidentally deleting an entire section of your mind map.
The latter enables you to “fork” the development of your map, working on one copy while keeping a snapshot stored for possible future use.
Sharing your mind maps
MindMeister’s simple collaboration tool makes it easy to invite others to view or edit your mind map via email. It displays a list of recent collaborators, so you can easily add them to your invitation list without having to type each of their email addresses. Nice!
A slider button also enables you to quickly share a link to your map’s URL – especially useful if you want to be able to paste it into a Slack chat, a SharePoint page or a presentation, for example.
Export options
The new version of MindMeister enables you to export your mind maps in a number of common file formats: PDF, a document outline, Microsoft Word, PowerPoint or image formats. You also also export to two mind map formats, with two more in the works: a MindMeister .mind file, FreeMind and soon, MindManager and XMind.
Focus mode
The idea behind focus mode is to provide you with a distraction-free environment for expanding or presenting your topics. All it seems to do in the new MindMeister editor is hide the toolbars from the workspace. But they’re so small that they weren’t really distracting. So I’m not really sure how this new feature actually helps users.
My preference? The REAL focus mode that some mind mapping software used to offer – but which apparently has gone the way of the dinosaurs… In this version, selecting a topic in your mind map and invoking focus mode made the rest of your mind map temporarily DISAPPEAR.
This really created a distraction-free thinking environment for building out the content of your mind map, one section at a time. When you were done, you simply “focused out” and the rest of your mind map reappeared in the editor.
In other words, I don’t think the new MindMeister focus mode goes far enough to help easily-distracted users to do their best thinking.
Conclusion
The Meister Labs development team is committed to providing its users with well-designed, intuitive tools that help today’s workers get more done. And it shows. The new MindMeister editor has all of the capabilities you expect to find in a modern mind mapping tool. But the team has packaged it in such a way that these tools stay out of your way until you need them – keeping your ideas front and center.
If you haven’t tried mind mapping software and are pondering a place to start, I can’t think of better tool than MindMeister. You’ll be up and running with its intuitive toolset in no time.
If you’re a more experienced user of visual thinking tools, I think you’ll find that there’s still plenty to like about this new iteration of MindMeister. Why not take a look at what’s new with it?


Leave a Reply